The Ultimate End-of-Lease Checklist: How to Prepare Your Car for Return

Returning a leased vehicle can be a source of anxiety, particularly when facing the possibility of unexpected charges for even minor damage. Leasing companies maintain stringent standards, and scratches, dents, scuffs, or interior wear could result in substantial end-of-lease penalties. However, with proper preparation, you can return your car confidently, avoid surprise costs, and potentially save a significant amount of money.
In this comprehensive guide, we’ll walk you through everything you need to check before handing back your lease vehicle. From examining paintwork and alloy wheels to understanding fair wear and tear policies, this checklist will ensure a smooth and stress-free return process.
Before undertaking any inspection or repairs, thoroughly examine your lease agreement and the fair wear and tear policy provided by your leasing company. This document outlines what constitutes acceptable wear and tear versus what might result in additional charges.
Key points to review include:
Paintwork: What are the acceptable levels of scratches and chips?
Alloy Wheels: What are the limits on kerb damage and scuffs?
Tyres: What is the minimum tread depth and acceptable sidewall condition?
Interior Condition: What standards apply to seats, dashboard, and upholstery?
Understanding these guidelines will help you focus your attention on the areas most likely to incur charges, saving you time and potentially money.
Minor damage such as bumper scuffs, door dings, and paint scratches are among the most common reasons for end-of-lease charges. Conduct a thorough inspection of your car’s exterior:
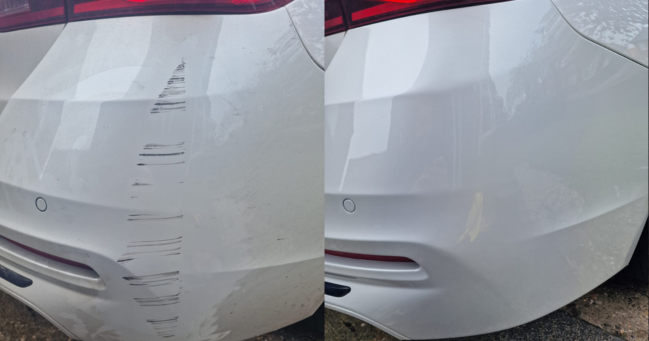
Bumper Scuffs: Check for scratches and scuffs on front and rear bumpers. These areas are particularly vulnerable to damage during parking manoeuvres.
Paintwork Scratches: Look closely for any chips, scratches, or faded areas. Even small scratches that break through the clear coat can result in costly charges.
Dents and Dings: Examine door panels and lower body sections for minor dents. Paintless dent removal (PDR) is a cost-effective way to fix these before returning the vehicle.
Stone Chips: Check the bonnet and front bumper for stone chips, which are common but can lead to charges if excessive.
Light Lenses: Ensure headlights, tail lights, and indicator lenses are free from cracks or significant scratches.
Windscreen and Windows: Look for chips or cracks that might need repair.
Door Handles and Mirrors: Check for scratches around door handles and ensure wing mirrors are undamaged.
Tip: Perform this inspection in natural daylight to spot damage more easily. A slowly moving light source, such as a torch held at an angle, can also help reveal subtle imperfections.
Alloy wheel damage is another common cause of end-of-lease fees. Inspect each wheel carefully for:
Kerb Scuffs: Often repairable with mobile alloy wheel refurbishment services.
Deep Scratches: May require a full refurbishment to avoid lease charges.
Corrosion: Check for bubbling or flaking, which can also incur fees.
Centre Caps: Ensure all centre caps are present and undamaged.
Remember to examine the entire circumference of each wheel, not just the visible faces, as damage can occur on any part.
Leasing companies typically require a minimum tread depth of 1.6mm across the central 75% of the tyre. This is not only a legal requirement in the UK but also a standard condition in most lease agreements.
Check for:
Tread Depth: Use a tread depth gauge for an accurate reading across multiple points on each tyre.
Sidewall Damage: Look for cracks, bulges, or cuts that might compromise safety.
Uneven Wear: This could indicate alignment issues that may need addressing before return.
Matching Brands: Some lease agreements require all tyres to be of the same brand and model.
Replacing tyres before the return could save you from inflated replacement costs charged by the leasing company. Many leasing companies charge premium rates for tyre replacement, making it more economical to source replacements independently.
The interior of your vehicle should be in good condition, showing only signs of normal use relative to the vehicle’s age and mileage.
Inspect:
Leather and Fabric Seats: Look for stains, tears, burns, or excessive wear. Pay particular attention to the driver’s seat, which typically shows the most wear.
Dashboard and Plastic Trim: Check for scratches, scuffs, cracks, or fading. Ensure all buttons and controls function properly.
Carpets and Mats: Ensure they are clean and free from holes, stains, or burn marks.
Headlining: Check for any marks, stains, or cigarette burns.
Door Cards and Armrests: Look for wear, scuffs, or damage.
Mobile interior repair services can fix scuffs, tears, and scratches at a fraction of the cost charged by leasing companies. Simple repairs can often be completed in hours and significantly reduce potential charges.
Before returning your lease vehicle, remove all personal items and give it a thorough clean:
Deep Clean: Vacuum the interior thoroughly, including under seats and in door pockets. Wipe down all surfaces with appropriate cleaners.
Deodorise: Remove any lingering smells, especially if you’ve transported pets or if smoking has occurred in the vehicle.
Boot and Glove Box: Ensure these areas are empty and clean.
Cup Holders and Storage Areas: Often overlooked, these areas can accumulate dirt and require specific cleaning.
Exterior Wash: Consider a professional detail to ensure the exterior is properly cleaned and polished.
A clean car not only creates a good impression but also makes it easier to spot any potential issues that might need addressing. Many leasing companies will charge for valeting if the vehicle is returned in a dirty condition.
Leasing companies can charge for missing items that were supplied with the vehicle. Ensure you return:
All Keys: This includes spare keys, locking wheel nut keys, and key cards.
Tools and Spare Tyre: Check for the jack, wheel brace, and spare tyre or inflation kit.
Handbook and Service Records: Make sure these are in the glove box.
Parcel Shelf/Boot Cover: Often forgotten, but can be expensive to replace.
Removable Seats: If your vehicle has removable third-row seats, ensure these are reinstalled.
Charging Cables: For hybrid or electric vehicles, ensure all charging equipment is present.
The cost of replacing these items through the leasing company can be significantly higher than market value, so it’s worth taking the time to locate everything.
Leasing companies expect vehicles to be serviced according to the manufacturer’s schedule. Failure to maintain the vehicle properly can result in substantial charges.
Ensure:
Service Records: All maintenance has been documented and stamps are present in the service book.
Oil and Fluid Levels: Check engine oil, coolant, brake fluid, and washer fluid are at appropriate levels.
Warning Lights: Ensure no warning lights are illuminated on the dashboard.
MOT: If required due to the age of the vehicle, ensure it has a valid MOT certificate.
Outstanding Recalls: Check with the manufacturer that any safety recalls have been addressed.
One of the most cost-effective ways to deal with minor damage is through mobile SMART (Small to Medium Area Repair Technology) repairs. These specialists can address a range of issues at your home or workplace.
Benefits include:
Convenience: Repairs done at your location, saving time and hassle.
Cost Savings: Typically 60-70% cheaper than main dealer repairs or leasing company charges.
Quick Turnaround: Most repairs completed within a few hours, allowing last-minute fixes.
Common SMART repairs include:
Bumper Scuffs and Scratches: Minor damage can often be repaired without replacement.
Paintwork Scratches and Chips: These can be colour-matched and blended to be virtually invisible.
Alloy Wheel Refurbishment: Kerb damage can be repaired and wheels restored to excellent condition.
Interior Scuff and Tear Repairs: Specialists can repair cuts, tears, and burns in most upholstery materials.
Dent Removal: Paintless dent removal techniques can remove minor dents without affecting factory paintwork.
Consider arranging a pre-return inspection to identify any potential issues that might result in charges:
Independent Inspections: Many companies offer unbiased assessments using the same criteria as leasing companies.
Leasing Company Inspections: Some leasing companies offer pre-inspections, though be aware these are not always binding.
Time to Fix: This gives you valuable time to address any issues before the final return date.
Peace of Mind: Knowing what to expect can reduce stress during the actual handover.
The cost of a pre-inspection is typically modest compared to the potential savings from avoiding unnecessary charges.
Before returning your lease car, take clear, time-stamped photos of:
Exterior: All sides, including roof, bonnet, and boot, focusing on any minor damage you’re aware of.
Interior: Seats, dashboard, carpets, and boot space.
Wheels and Tyres: To document their condition, including tread depth.
Odometer Reading: To confirm the final mileage.
Part-exchanged Items: If you’re including anything as part of the return.
This evidence can be invaluable if there are disputes about the car’s condition after you’ve handed it back. Store these photos securely and keep them until any final settlement has been agreed.
Late returns can incur daily charges, so ensure timely return:
Book an Appointment: Confirm the date, time, and location for the return.
Get a Receipt: Ask for written confirmation that the car has been returned and the condition noted.
Record Details: Note the name of the person accepting the vehicle.
Keep Copies: Retain copies of all paperwork and communications until the lease is formally closed.
Check for Final Charges: Request a breakdown of any additional charges assessed during the inspection.
By following this comprehensive checklist, you can save money, avoid surprise charges, and return your lease vehicle with confidence. The small investment of time and potential repair costs upfront can save you from much larger charges after returning the vehicle, when you’ll have little negotiating power.
Contact The SMART Repair People now to see how much you could save with our mobile repair service. Our skilled technicians specialise in lease return preparation and can help ensure your vehicle meets return standards at a fraction of the cost of dealer repairs or lease company charges.
Our nationwide team of repairers are ready to help you with any car body repairs. We come to you!
Click here for your free quote