Car Paint Stone Chip Repair: Expert Tips & Techniques
Stone chips in car paint are a frequent nuisance for UK motorists, often caused by road debris on our motorways and country lanes. If left untreated, these seemingly minor blemishes can lead to rust and further damage, particularly in our damp British climate. This comprehensive guide provides expert tips on repairing stone chips, when to opt for professional help, and how to prevent future damage to keep your vehicle looking its best year-round.
Stone chips are minor but potentially significant forms of damage that occur when small rocks or debris hit your car’s surface at speed. These impacts chip away the paint and expose the underlying layers, creating vulnerable points in your vehicle’s protective coating.
In the UK’s variable weather conditions, these exposed areas become particularly problematic. Our wet winters and salt-treated roads create the perfect environment for oxidation and corrosion to take hold. Once moisture reaches the exposed metal, rust can begin forming within days, especially in coastal areas where salt air accelerates the process.
Beyond the structural concerns, stone chips also detract from your vehicle’s appearance and can significantly reduce its resale value. UK car buyers are particularly discerning about paintwork condition, with many using stone chips as negotiation points when purchasing used vehicles.
The typical paint structure on modern vehicles includes:
When a stone chip penetrates through multiple layers, the repair process becomes increasingly complex. Understanding which layers have been compromised is essential for determining the appropriate repair approach.
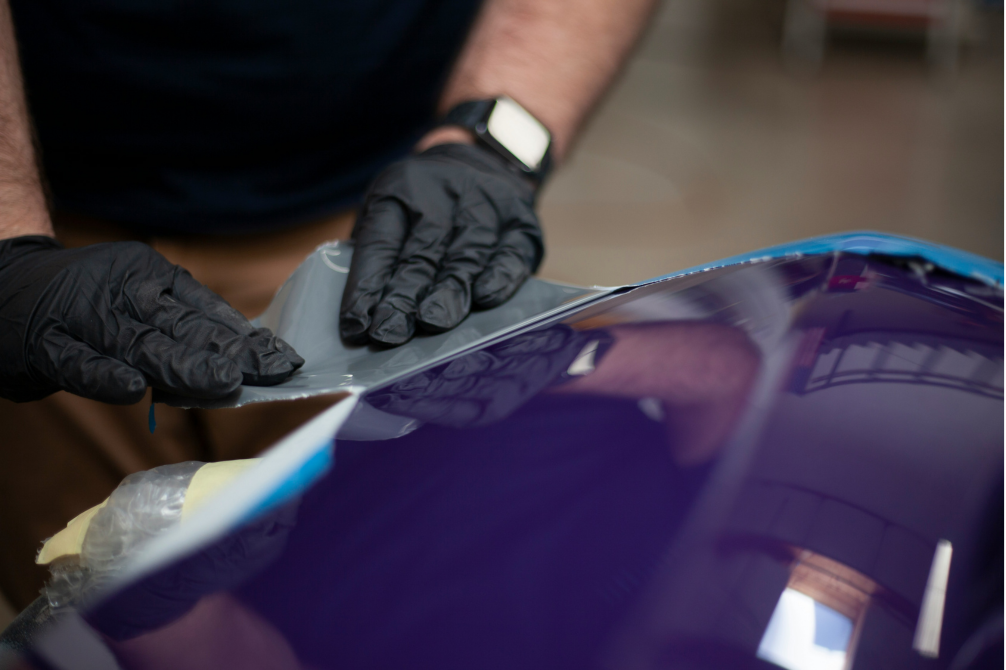
While DIY kits are readily available from Halfords and other UK automotive retailers, they’re not always the best choice for every situation. You should consider professional repair when:
The chip has exposed bare metal – In the UK’s damp climate, exposed metal can begin oxidising quickly. Professional repair ensures proper preparation and sealing to prevent rust formation.
The damage is in a highly visible area – Bonnet, wings, and door panels require meticulous colour matching and blending that’s difficult to achieve with DIY methods.
Multiple chips are present – When dealing with widespread chipping, professional treatment ensures consistency across repairs.
You drive a premium vehicle – Luxury or high-end vehicles (Jaguar, Range Rover, Aston Martin, etc.) require specialist knowledge of their unique paint formulations.
The chip is larger than 5mm in diameter – Larger chips often require filling and professional paint blending for an undetectable repair.
DIY repairs can go wrong in several ways that UK vehicle owners might not anticipate:
Colour mismatch issues – UK cars often have region-specific paint codes that generic touch-up products won’t match perfectly. Even minor variances become obvious in direct sunlight.
Improper preparation – Failing to remove all contamination from the chip can lead to adhesion problems later.
Overfilling the chip – Applying too much paint creates raised areas that catch the eye and collect dirt.
Neglecting clear coat application – Without proper sealing, your repair will quickly deteriorate in Britain’s variable weather conditions.
Poor blending technique – The transition between repaired area and surrounding paint should be imperceptible, requiring skill and practice.
If the stone chip damage is minor and you’re confident in your abilities, you may be able to repair it yourself. For UK drivers, timing these repairs is important – choose a dry day with moderate temperatures (15-25°C) for optimal results. Here’s a comprehensive step-by-step approach:
1. Gather Your Supplies
Before beginning, ensure you have:
For UK vehicles, your exact paint code can be found on the vehicle identification plate, typically located in the door jamb or under the bonnet. Alternatively, contact your local dealer with your registration number for the correct code.
2. Clean the Area Thoroughly
3. Assess the Damage Properly
Carefully examine the chip to determine its depth:
– If you see primer (typically grey, white or black), the base coat has been compromised but the metal is protected.
– If you see bare metal (shiny silver or steel colour), you’ll need to address potential rust issues.
– Check for any rust formation within the chip – this must be treated before repair.
4. Address Any Rust Formation
UK-specific note: Our damp climate makes rust treatment particularly important. Don’t skip this step if you spot any orange or brown discolouration.
5. Prime the Chip (If Necessary)
If the chip has reached the metal:
6. Apply Touch-Up Paint Correctly
This crucial step requires patience and precision:
7. Apply Clear Coat Protection
Once the base colour has dried completely:
8. Final Finishing Touches
After the clear coat has fully cured:
Repair costs in the UK market depend on several factors including severity, location, vehicle make, and your geographical region. Here’s a breakdown of typical 2025 pricing:
DIY Options:
Professional Services:
For premium or luxury vehicles, these costs may increase by 20-50% due to specialised paint formulations and finishing requirements.
Many UK insurers now offer stone chip repair services under comprehensive policies without affecting your no-claims bonus. Check your policy details, as some providers include this as standard while others offer it as an affordable add-on.
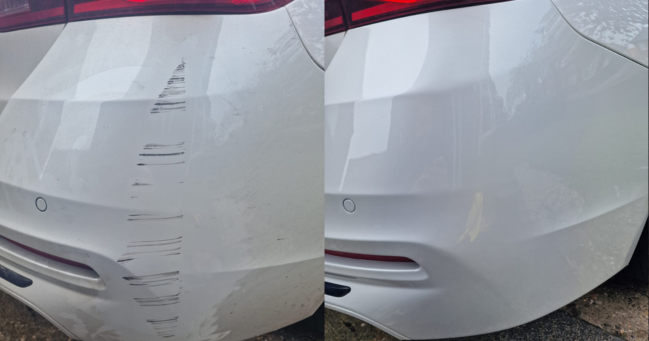
Most stone chips can be repaired, but success depends on several factors:
Modern SMART (Small to Medium Area Repair Technology) techniques allow professional technicians to achieve nearly invisible repairs on most stone chips under 10mm in diameter. For older or more extensive damage, expectation management is important – improvement rather than perfection may be the realistic goal.
Special considerations apply to these complex finishes:
For DIY repairs on these finishes:
Professional repairs for these finishes may involve blending techniques using compressed air and specialised equipment to match the particle distribution and orientation. This is why metallic/pearl repairs often benefit most from professional attention.
This popular myth needs clarification. WD-40 may temporarily mask very light surface scratches by adding an oily layer that reflects light differently, but it offers no permanent solution. In fact, it can complicate proper repairs by:
For genuine scratch removal, proper automotive polishing compounds or paint correction products are required. The Society of Automotive Engineers (SAE) categorically states that petroleum-based products should not be used on automotive clearcoats.
Prompt attention to stone chips is particularly important in the UK climate. Ideally, chips should be addressed within 1-2 weeks of occurring because:
Even temporary protection measures like clear nail varnish can provide interim protection until proper repairs can be arranged. The cost difference between repairing a fresh chip and addressing one that has begun to rust can be substantial.
Yes, UK drivers experience regional variations in stone chip frequency:
Vehicles regularly driven on newly-surfaced roads are particularly vulnerable, as the fresh chippings haven’t yet been fully embedded into the surface. Transport for London data indicates chip claims increase by 40% following major road resurfacing projects.
Several factors contribute to persistent chipping beyond driving habits:
Vehicle manufacturers acknowledge these issues through their warranty structures – most exclude stone chips from paint guarantees specifically because they’re considered unavoidable with normal use.
UK motorists have several effective protection options:
Paint Protection Film (PPF)
Ceramic Coatings
Vinyl Wrapping
Traditional Protection Methods
For maximum protection, many detailing specialists recommend a combination approach: PPF on high-impact areas (bonnet, wings, mirrors) with a ceramic coating applied over the entire vehicle.
Beyond physical protection, adjust your driving habits:
Increase Following Distance
The Highway Code recommends a minimum two-second gap, but increasing this to four seconds significantly reduces stone chip risk, particularly behind HGVs and construction vehicles.
Lane Positioning Awareness
The inside lane of motorways typically accumulates more debris. When safe, positioning your vehicle toward the right side of your lane can reduce exposure to roadside debris.
Speed Moderation During Adverse Conditions
Reducing speed by just 10mph during rainfall or after road treatments can dramatically decrease the impact force of any debris that does hit your vehicle.
Alternative Route Selection
Navigation apps now offer “scenic route” options that often utilise better-surfaced A-roads rather than motorways. Though slightly longer, these routes may present less chip risk.
Construction Zone Protocols
When passing through roadworks, temporary lower speed limits aren’t just for safety – they also reduce the likelihood of surface material becoming projectiles.
Once your stone chips are repaired, maintaining your car’s protection should become part of your regular routine:
Quarterly Inspection Schedule
Seasonal Consideration
Professional Maintenance
Taking these proactive steps ensures your vehicle maintains its appearance and value throughout your ownership. In the competitive UK used car market, immaculate paintwork can add hundreds or even thousands to your vehicle’s resale value, making proper stone chip repair and prevention a worthwhile investment.
Our nationwide team of repairers are ready to help you with any car body repairs. We come to you!
Click here for your free quote